Showing posts with label Turk's-Head. Show all posts

Friday 26 October 2012

Cotton Chest Beckets. For Sale!

How Do All ;-)

I am selling what is probably one of the most beautiful pairs of Sea Chest Beckets you may have ever laid eyes on!
The price of these Beckets is in no way a true reflection of the many hours of work involved to create such a work, they are for me, priceless!


The core of the beckets are a selvagee strop, marled, parcelled, and a puddening of canvas applied, this is then served with Tarred Marline before being covered. 
The Eyes are ringbolt hitched in cotton, the legs are of needle hitching in cotton and the bails are 8 strand x 5 ply coach whipping in cotton.

 The bolt is of 3 strand hemp, wormed, parcelled and served , this is covered with a leather chafing piece and 4 pinked leather washers, the ends of the bolt are finished of with painted, canvas covered manrope knots.

 The finish is hand mixed, natural, Bleached Shellac.

Approx size of each Becket: 
height 260mm x width 155mm.

 Small and large Turk’s-Head knots in flax finish the covering.

These Beckets were featured in the pages of Knotting Matters #80 & #100 (the magazine of the International Guild of Knot Tyers)

The wood cleats are of Lignum Vitae, they have pilot holes drilled and also come with screws for fixing, but if you wish you could fix the cleats in the traditional way using copper rivets, (the cleats would need drilling through to do this.

Now the business end of the deal!

For this unique, one off and completely unrepeatable work of art I am asking a kings ransom of £1,750.00

Postage is (contact me for a quote) Royal Mail Special Delivery in the mainland UK.
All other destinations will be sent by "airsure" or "international signed for" if the service is available for your location, please contact me for an accurate shipping quote if outside the UK, as shipping costs may vary considerably depending on location.

Contact Me: knotty (dot) bear (at) gmail (dot) com

You can see more of my Chest Beckets here:

Thanks for looking.
Take care,
Barry ;-)


Saturday 8 October 2011

Two B, or Knot Two B!

Two B, or Knot Two B!
Is that a question; or a statement, and does anyone really care?


Well I care, and have spent the past two years or more nursing an idea that I was not able to properly bring to life.
The Two B's in question are my Initials, and the Knot in question is a 3 part x 4 bight Casa Knot (simple over one under  pattern Turk's-Head) also known as a Carrick mat in its flat form.

My idea was to create a logo for myself using my initials, and some how linking them in such a way to create an interlinked knot like structure. I tried as many ways of linking two B's together as where physically possible, but the B's would not have it in their original form.
Then one day it hit me whilst playing around with a Carrick mat; that I could use the same single strand form of this knot to create Two perfectly joined, symmetrical B shapes, all that was needed to really make the B's stand out was 2 different colours.

I drew the logo out many times on paper until I was happy with the shape and then scanned it into the computer thinking I would quickly be able to make a perfect  logo graphic from my drawings, I bust my ass trying to get the expensive drawing program do what I wanted, but due to my lack of computer savvy; and short temper I gave up and the logo sat in my To Do pile for the duration.

A stroke of luck and a common shared interest in LDP (Long Distance Pumping) (skateboarding long distances without pushing; for those still scratching their heads)  enter Tim Pritchard of Pritchard Skate Designs (PSD).
After having a Rad day tearing up the pavement at Dorney Rowing Lake with Tim; and learning of his skills with CAD and the like, a few emails followed and Tim kindly took my basic scanned drawings and was able to draw up my design in Cad and tweak it till perfect. He then saved the drawings as Photo Shop files; with which I could play with the layers, colors and effects till my heart was content, and what you see above is the sum of that two years faffing brought to life in less than a two weeks!

So; a Big Thank You to Tim for helping be bring my idea to life, it would have still been on the To Do pile till Worlds end otherwise.
Also a Big Thank You to my friend Clive S. for helping me out with, and getting me properly sorted with Photo Shop, Skype Screen Sharing is a tool worth more than a thousand words ;-)

So where now?
I am now completely happy with the design and the only thing that I might change is the lettering style of my name in the right B, I will also be using the BB logo without my name in the right B for all my off line activities, and may change the colour of the right B to suit certain projects.

I have now updated my main web site incorporating the Logo on the front page, and changing the colours scheme of the site to match.


I hope you all like.

Take care,
Barry ;-)


Saturday 20 August 2011

Bags, Bugs & Bikes.

Been a Busy "B" Lately.
Bags
A Draw Corded Ditty Bag.
I was asked if I could create a standard sized bag with a hemp draw cord by some folks in Canada, and yes; I know I said I was not going to do this type of work again, but as I happened to have a couple of unfinished bag bodies, and also because I find it hard to say No! I got to work, and below is what I came up with from my brief.
The folks from Canada never got back to me; but luckily the bag has now been sold to another more deserving person :-)
 
Hand seamed in 12oz Cotton Duck canvas, with 6 hand sewn grommet eyelets. 

Threaded with a Hemp draw cord, the ends joined with a doubled Bosun's Lanyard knot, and finished with a seizing in waxed Hemp twine.

The sliding closure; or puckering knot is a single strand Mathew Walker knot, made with my own hand laid Hemp twine; and sized with a natural sealer. 

Some of the tools of the my trade.

Puckered up and ready to go.


Bugs.

In between jobs I decided to do a little R&R in the garden; and whilst minding my own business a little Grass Hopper hopped over for a chat, before gettign down to the business of making little Grass Hopper's with his mate; whom was keeping an eye on her mate from the adjasent Rose.


& Bikes.
And on to the business of serious fun making!
I have been fetteling with my race / road training bike over the past few weeks, I still have a way's to go yet but this is what I have done so far.

I concentrated mainly on the rear wheel and wheel disks, the original Carbon fibre moulded disks I made; and had great success with; actually winning races in my class ;-) have now been passed on and I set about building a whole new rear wheel, the main reason for a new wheel was to trim a little weight off, quieten th e thundering noise I got every time I hit a bumb; and that the original rim did not have enough surface area for attaching the fabric covering.

The covering is is a very light weight ripstop nylon which is stretched and bonded to the rim before being sealed with cellulose.

here on the non drive side you can see the foil tape patch that gives access to the valve stem for pumping the tyre, the patch make the wheel more aerodynamic than if it was left with the gaping hole in it.

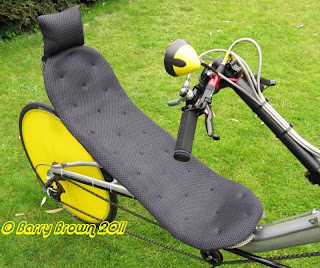
I then got down to the business of comfort and made a new air mesh padded seat pad, and pillow neck rest from the same materials, and I can confirm that it is too comfortable, I have been spotted napping on several occasions whilst out and presumably training ;-)
I could not help myself and had to add a nice dimpled look to the pad very cushy.

I still have the new bars I made to fit, which include a whole new brake and gear operating system, some serious chopping and modding going on there.
more to follow soon?

Take care,
Barry ;-) 
Friday 4 March 2011

A “Single” Strand, Extended Version of ABOK #1389.


Yup’ that’s right a single strand version of the two strand knot found in “The Ashley Book of Knots” ABOK as it is known amongst us Knot Freaks.
The knot is shown in the book as knot #1389 in the Turk’s-Head section though not really a Turk’s– Head except in the definition that it is a continuous cylindrical braid.
This knot is related to ABOK #3054; a 17 strand half round sinnet.
ABOK #1389 is actually a two strand knot consisting of an underlying 6 part Turk’s-Head which is then interwoven with another 11 parts; making this a 17 part knot.
We have the very clever French man Norbert Trupiano to thank for working out the trick to make this knot work as a single strand knot, and Charles Hamel for publishing Norbert’s findings.
Please see Charles Website were you will be able to find more information.
The original Diagram as shown in ABOK has only 14 bights on the edges of the diagram, this extended knot as pictured above left uses a diagram with 98 bights on the edges of the diagram.
I was the second person in the world to have tied this knot in its extended single strand version?
And after tying it I can see why ;-)
Anyone else tried it yet?

How Did I Do It.
But first: I must say thank you to Norbert Trupiano for making this version of the impossible knot possible, and thank you to Charles Hamel for publishing the needed information to get a good start, and also thank you to Ognyan Savov and Alain Legeay for bringing this knot to my attention.
First off; I decided to make a small 50 bight version to see how it would work out and get a feel for the cord length.
The diagram I used was copied from ABOK and resized to suit making a pattern with 50 outer bights, which I pinned to a foam covered tube of the right size to fit the circumference of the joined pattern and then tied the knot you see pictured on the left in 1.2mm hollow nylon braid.
I started with about 8 meters of cord most of which was wasted after tightening the knot fully. The finished knot is about 40mm I/D.


Now for the real deal!
I resized and printed Norbert’s pattern to make a cylinder of 220mm with 98 outer bights on the pattern, I stuck this onto my foam covered form and put in the pins for the base knot, this I tied in blue nylon twine.
I then followed the rest of the pattern with the 1.2mm diameter, hollow Nylon cord.
See the picture below of this stage complete.


On its side you can see the 492 pins I used to keep everything in place ;-/ no easy task making this knot I can tell you!


After completing the interwoven part of the knot, I then replaced the blue nylon guide twine of the base knot with the white nylon cord used to tie the interwoven part, now making this a single strand knot.
You can see the completed knot on the form below, isn’t it funny how someone always manages to cut off your head in photos ;-)

Once we got this far; there was no turning back, I just had to finish it, so after checking for errors I pulled the pins and started the arduous task of tightening this beast up.
It took a fair while to get it down from 220mm diameter to just 75mm inside diameter, and after all that effort you can se the finished result below.
I started with around 20 meters of cord and after completing the knot I had just over 13 meters or so left.
I hope you like?
Please; if you do have a go at this knot; let me know how you get on.


Below: you can see the finished bracelet pictured with one of the gorgeous tools PJ made for me.