Sunday 3 April 2022

New Cord Maker Modifications, And Adding A Core To A Cord

How Do All,
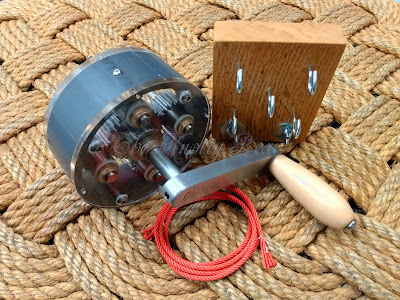
I was recently asked by a customer if I could add a central hook to the cord maker which I produce, and also a removable manual crank handle.
The reason for the central hook is that the customer would like to use the cord maker for making cords/rope with a central core, like shroud laid rope.
From the Oxford Reference:" The name given to rope laid up with four strands instead of the more usual three. The strands are laid up round a heart, or central, strand, as the four strands would not bind close enough together, and without a heart would leave a central hollow. Size for size, shroud-laid rope is not as strong as hawser-laid rope. However, it is less liable to stretch, and therefore proved more suitable to be used in sailing vessels as standing rigging."
And the reason for the manual crank handle is so that the machine can be used as a traditional cord maker, using a traveller and rope top for forming the strands into a cord/rope.

Making a cord or rope with a core is not so easy in itself, and made in the traditional method the yarns would have been spun up into strands, and then the core positioned before the rope was laid up, the rope top having a central hole for the core strand to pass through.
Also due to the rope becoming shorter that the length of the strands as it laid up; the core would have to be managed by another set of hands.

My cord maker, and cord making method being completely different from the traditional means that the above method will not work as the cord forms from the centre out, all the time the drill spinning at high speed, so no space, and not safe for another set of hands to manage the core at either end! however my cordmaker can be used single handed so friends or helpers are entirely optional.

So, after trialling several different ways that I could possibly use my cord maker to make a cord or rope with a core strand I finally came up with the one thing that actually works.

I attached a ball bearing swivel to the central hook on the machine, this allows the machine and hooks to rotate as intended without the the central core being over twisted or untwisted, as either of these would effect the lay of the final cord and its integrity.

At the opposite end of the cord/rope walk sits the outend; which replaces the traveller as the cord maker itself travels instead, I added a central hook here also and the core passes over this and off the bench, the end of the core strand is weighted to take up the slack as the strands are initially spun up.

Below you can see the core strand exiting the formed cord.

If you have any questions regarding making cords/rope with my cord maker, either with or without a core; please feel free to ask.

Take care,
Barry, The Knotty Bear

Saturday 17 April 2021

Cord Making Machines.

 How Do All,

I have been busy making tools the past few weeks for customers in various parts of this small world.

Here are a few of my recent cord making machine sets, all now gone, but more are being made in my small workshop and are available to order. 
Details can be found here:  Tools and Materials Shop

 
Ideal for making your own cords for Ply-Split Braiding & all other Cord Crafts.
Please see my Ply-Split Braiding page for examples of some of the items I make using my own hand made cords.

This machine quickly and efficiently makes cords from all kinds of yarns, including toilet paper and plastic bags if you like, made to your own diameter preference and firmness of lay from soft to super hard,  S or Z laid cord can be made, mixed colour or mixed yarn cords can be made. You are only limited by your imagination and whatever yarn you have.

These machine are designed and completely hand made by myself from the finest materials in my small workshop. I use these very machines myself and I have been making and using them for over 10 ten years without failure.

These outends are made from recycled Oak, some of which had some nice oil? stains.
The wood is sanded and sealed with several coats of shellac.

Detail of the brazed hooks.

Making a 10 meter sample of 10mm diameter sisal rope, made with very fibrous packing twine.


Thank you for looking,
Take care,
Barry.

Some New Grip Fids.

How Do All,
Whilst busy making cord making machines, I also made up some Gripfids for a customer to go with their machine, which they requested the handle to be left off so that they may possibly carve their own. 
Whilst I was at it I decided to make a new set of Gripfids for myself as I sold all but one of mine to a customer that was desperate to get hold of them. 
There are 1/4", 5/16" ,3/8" and 1/2" diameter Gripfids here.
I also made a small 1/4" double ended Gripfid which I am sure will prove unnecessarily useful! 

I covered one of my smaller Gripfids with a 5 Pass, Type 5 Pineapple Knot, with a varied interweave.
I love these knots, probably my favourite knot to tie and I tie them with no instructions, just straight out of my head and into my hand.

Along side a large covered net float which I found on Walney Island many years ago. 
this is another Pineapple knot with a varied interweave.

Like a star flower

The knot is made up from 5 separate 6 bight x 7 lead Turk's-Head Knots or Casa Knot if you like.
Tied in 1.5mm polypropylene twine.

Thank you for looking.
Take care,
Barry

Sunday 21 March 2021

Refurbishment of a customers 140 year old Chest Beckets

How Do All,
I was recently sent a pair of around about 140 year old antique sailors sea chest beckets for refurbishment.
This is something I have not done before, and had both beckets been in better condition I would have opted to preserve them rather than refurbish them.

The owners of the beckets also have the original chest and cleats which they have now refurbished themselves.
Both the chest and beckets still belong to descendants of the original owner. and they actually have lots of original paperwork giving the name and dates of the sailors birth, his travels, and also his passing; I think this is absolutely amazing that these have survived for over 140 years, are still together, and in the same family.
The Able-Bodied Seaman John Lewis was born in 1866. 
You can see some pictures of the finished chest, and also some of the documentation shown at the end of this post, with kind permission of the owners. Thank you.
 
The chest and beckets had been covered in white gloss and other modern type paints over the years, and about thirty years ago the current owners had a go at removing the paint from one of the beckets, hence why the two look very different in the before pictures.
 
The chest, cleats and beckets.
Photo with kind permission of the owners. 

The beckets as I received them.

Lovely white gloss over everything.

The other becket stripped bare.

Upon examining the beckets for myself, I discovered that the remaining bolt rope had been chafed through to the iron core, and the rope and tarred marline under the fragile and chafed leather had all but rotted to dust.
The pinked leather washers on one side had been stretched and the holes enlarged, cracking and splitting the dry leather in the process. 

Chafed to the bone so to speak, from use and the harsh marine environment no doubt.

After the leather had been removed the end knots pretty much fell away of their own accord.


The six surviving pinked leather washers, the ones on the right had been enlarged by the becket legs pushing them outward and over the end knot of the bolt rope.

The perished remains of the surviving bolt rope, and one of the leather washers in the background.

On the still painted becket I carefully removed the outer layers of paint (I actually spent several days with paint stripper, white spirit, and methylated spirit baths and an a tooth brush or two) revealing what remained of possibly the original finish. 
The original finish appeared to be a dark red ochre/oxide colour over the tarred marline bails (central handle part), the legs and eyes where in white, and the Turk's-Head knots in a vaguely greenish blue, the manrope knots on the ends of the bolt rope appeared to be the same blue but with a possibly later added red central part.

This was as far as I was willing to strip the good becket, and I wanted to save as much of the remaining finish as possible, had both been like this, then a clear coat to preserve this state would have been my preference.

On the left you can see the original red ochre/oxide colour over the tarred cord.

One of the end knots of the bolt rope showing the later? red centre, it looks as if the blue was painted over with white and then the red centre, but only the original owner/s would know for sure.

After soaking the misshaped becket for several hours I reshaped it as best as possible, but was not able to remove the lumps and bumps under the coving of the bail (handle part), and remaking the becket from scratch was not a viable or cost effective solution.

The reshaped becket on the left. 
Also the makings of the new bolt ropes and a start on the pinked leather washers.

I made up two new bolt ropes from hemp rope over a rust-less steel core and, and made up twelve new pinked washers in 3 different sizes based closely on the originals.

Mocking up the new bolt ropes for size and looks.

After several coats of shellac and primer paint I opted to paint the beckets in colours I thought complimentary to the originals though not an exact match. and the deep teal colour used on the knots was a request from the customer, and I think a good call as the blue colour I was looking at would not have looked half as good in my honest opinion. (the teal knots are actually more green in real life, they appear more blue in the pictures)

Freshly finished with optional cleat fixing hardware.

I was not able to make the pair physically match, as they started out in very different states of repair, also when originally made by the sailor they may have not been made simultaneously so have different thicknesses of material as well as physical proportions, I am however very happy with how they turned out.

The chest  and beckets back together again.
Photo with kind permission of the owners. 

The chest belonged to able-bodied seaman John Lewis
Photo with kind permission of the owners. 

The opposite end of the chest.
Photo with kind permission of the owners. 

Certification of service aboard the Barque "Lota" from the vessels Master
Photo with kind permission of the owners. 

A telegram to Ann Lewis (wife) from the Barque "Lota"
I can only half read it at best.
Photo with kind permission of the owners. 

Certification of service aboard the vessel "Indian Empire" from the vessels Master.
Photo with kind permission of the owners. 

Thank you for looking,
Take care,
Barry / The Knotty Bear

Sunday 28 February 2016

New Shop Items! A Beautiful Hand Braided, Knife, Tool, Wallet or Key Lanyard

How Do All ;-)

I have just added a new item to my Etsy Store

This is a Beautiful hand braided, Knife, Tool, Wallet or Key Lanyard.
Made in Red, 2mm, 16 plait polyester with a small blue fleck in the pattern.
Please see my Etsy Listing. for more pictures and details.


(I can make this lanyard to order, in Red, Blue, Black Fluorescent Yellow or White (see my Dragonfly Brooch listings for actual colours). Also to any length or other custom requirement, please contact me with your request)

The knife, tool, wallet or keys are attached to the end loop with a short tail (loop of cord), made fast with a sheet bend and a doubled wall knot stopper (see pictures), alternatively you can attach whatever you have with split rings or by hitching the item directly to the bottom loop of the lanyard.

The buttoned end can be attached to your belt, belt loops, bag, anything with D-Rings and so on, the uses are only limited by your imagination.

The lanyard is made up from an 8 strand square sinnet, with a 4 strand round sinnet loop in one end, the other end has a button hole braided with two, 4 strand round sinnets, and finished off with a complex rose sinnet knot button.
The button is impregnated with a water proof coating to stiffen the button and make it more durable in long term use.

The total length of the lanyard is 700mm (not including Knife)

A knife / tool lanyard would have been used by a rigger, sailor or any craftsman working at height to attach their tools to their harness, belt, tool bag or other object to save loosing the tool should it be dropped, also possible saving injury or damage to persons and property below.

**Please note: the Dragon Fly Brooch, Leatherman tool, Wallet and keys pictured with this lanyard are not included with this sale, however if you like to buy the matching Dragonfly Brooch you can find it in my store.**

The same design in Blue cord. For more pictures please see here:

Thank you for looking,
Barry ;-)

Friday 26 February 2016

Knotty Bear getting all Knotty again!

How Do All ;-)

So, it's been a while since I did anything new on the knotting front, and when I get the urge to tie something I don't hold back!
I decided to tie a long pineapple knot with a varied pattern, just to make sure I was still on top of my game.

Below is a picture the finished Pineapple Knot being examined by Buddha.
I think he probably approves.


This is a 90 part x 48 bight, 6 Pass, Type 6 Pineapple Knot, with a varied interweave, tied over a beach combed fishing net float which I found on the beach near my old home town of Barrow-In-Furness

There are loops at each end formed from one long length of 10 strand trapezoidal braid U6, O2, spliced and stitched into a continuous strop.

There are two 12 part x 12 bight, 2 Pass, Type 2 Pineapple Knots sitting either side of the main knot, with a foundation of 8 bight, Single Strand Matthew Walker Knots.

All tied in 1.5mm line.

The braiding of the 10 strand trapezoidal braid in my braiding clamp.

The total length is 190 mm (7.5") x 45 mm (1.75") This would make one very large and very buoyant key fob for your boat keys, or a very nice light or fan pull handle, or the grip on a dirty bag, etc. etc..

The main Pineapple Knot is actually made up from 6 separate 15 part x 8 bight Turk's-Head knots, these are all interwoven into one single knotted covering. the fact this has a varied pattern makes it that much more special.

If you are a Knot Tyer and wish to try your hand at this interweave, or at least one very similar which is easily altered to make this interweave, bearing in mind you should be at least able to tie a standard multi pass Pineapple Knot, then please check out my help tutorial here: Pineapple Knot interweave tutorial. please note, this link will open a new window!

A close up of the finished Pineapple Knot, being examined by Buddha and in my hand for an idea of size

Thank you for looking,
Take care,
Barry ;-)

Tuesday 1 December 2015

My Etsy Store, Update #2! More New Items!

How Do All ;-)

I have just added some more new items to my Etsy Store Jewellery Section.
Rather than list every single item here in duplicate here are a few pictures of the items, and you can see the full details in my store. My Etsy Store

These are my beautiful Dragonfly Brooches!


Thank you for looking!
Take care,
Barry ;-)